Setting up a Members Gallery.
What do you need to do.
- First you need to have set up a Flickr account. If you have not done that and need some help there is a How To on the website.
- Once you have a Flickr account then you need to do a few things. First you need to find your User ID. There are a number of ways of doing this :
use this URL:
http://imapflickr.com/helpers/how-to.aspx?t=flickrUsername
another method:-
( Windows Only – there does not appear to be a Mac Version of this ) On you Flickr Home page you have a buddy Icon. This is located at the top right hand side of the screen and by default it is a camera. (You can change this in your settings) . Position your mouse pointer over the icon and Right click. A popup screen will appear with a lot of options. Click the option View Image Info. it will look similar to this :

This brings up another popup showing a lot of information regarding the Icon. E.g.
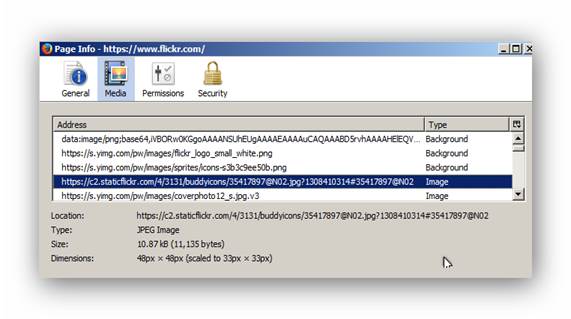
The line that is highlighted contains your User ID it is the Number sequence at the end after the # i.e. 35417897@N02. If you right click on the highlighted line and then copy you can paste the line into another document for later reference.
OR
visit :
OK that it for the User ID.
- You need to select the photos that you want to be in the Gallery and add a Tag to them. The easiest way to do this in Flickr is to go to your home page in Flickr. Click on You at the top left hand side of your Flickr page and then click Organize.
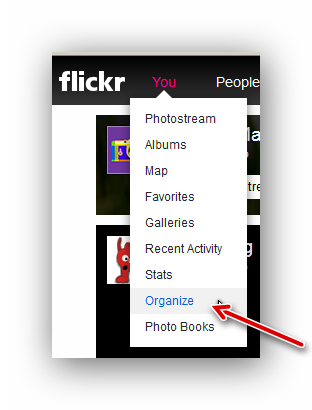
This brings up a screen where you can organize the photos and edit some information. At the bottom of the screen there will be all the thumbnails of your photos. Drag the ones you want to be in the gallery onto the main screen. Then click Add Tags :

Another pop up appears
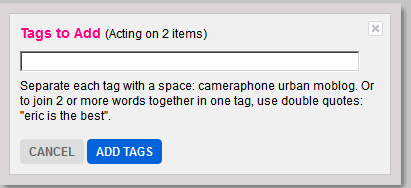
Type in the Tag you wish to be on all the photos in the Gallery. A Tag is just a name. Single words are best. If you want more than one word and the words have a space between them then you need to enclose them in Quote Marks e.g. “My photos” otherwise it appears as two separate tags. Click the ADD TAGS button and that is it.
- You need to choose what type of gallery you prefer. Go here and make a choice from the four available Gallery types.
http://www.welwynphotoclub.org.uk/gallery-choices
Now you need to send us the following information. Your User ID. The Tag you have put on all your photos. The Gallery Choice you made (1, 2, 3 or 4) once you have made a choice it cannot be changed for a minimum of 3 months.
Go here to send the information:
http://www.welwynphotoclub.org.uk/member-gallery-request
Your Gallery will be verified and should be visible in about a week.
NOTES
You are limited to 20 photos in the Club Gallery. This is partly due to Flickr restrictions. However you can have as many photos as you like with your club website TAG. You can make changes to the tagged photos at any time so you are in complete control of which photos appear on the Club Gallery. If for example you have 20 photos tagged and you remove the tags from 5 photos and then add 5 other photos with the Club Gallery Tag the new photos will appear in your gallery.
Galleries 2, 3 and 4 are sorted by your Flickr photo description. This means you can give your photos a description in Flickr and they will appear in that order on the club website. e.g. You could use as the description 1 My photo , 2 My next photo etc. etc. The description does not appear on the club website but may on Flickr.
.
New photos or any changes can take up to 12 hours to appear due to Flickr caching.
We reserve the right to remove Members Galleries.
Galleries from members who leave the club will be removed. ( with certain exceptions)